Showing posts with label Histogram. Show all posts

2/22/2023

Histogram drawing using matplotlib by python code.

 Refer to code:

first one is draw histogram

second one is for drawing simple graph


drawing histogram

.

import matplotlib.pyplot as plt

# Data to plot
data = [(40, 1.646054384000001), (233, 3.0769193350000013), (221, 2.6460548819999996),
(214, 2.3542021680000005), (322, 2.726835301999998), (94, 1.201160183999999),
(193, 2.501363478000002), (171, 1.3009034040000031), (595, 5.574669749999998),
(248, 2.455411452)]

# Separate the data into two lists for word length and processing time
word_lengths = [d[0] for d in data]
processing_times = [d[1] for d in data]

# Plot the histogram
plt.hist(processing_times, bins=5)

# Add labels and title
plt.xlabel("Processing Time")
plt.ylabel("Frequency")
plt.title("Histogram of Processing Time")

# Show the plot
plt.show()

..


drawing graph

.

import matplotlib.pyplot as plt

# Data to plot
data = [(40, 1.646054384000001), (233, 3.0769193350000013), ..]

word_lengths = [d[0] for d in data]
processing_times = [d[1] for d in data]

plt.bar(word_lengths, processing_times)
plt.xlabel("Word Length")
plt.ylabel("Processing Time")
plt.title("Histogram of Word Lengths vs. Processing Times")
plt.show()

..


Thank you.🙇🏻‍♂️

www.marearts.com

1/14/2018

Histogram Equalization, Stretching, origin histo compare and example source code

Example source code for histogram equalization
and compare with origin histogram and stretching histogram.

result is like that:

origin image & histogram


stretching image and histogram


Equalization image and histogram
 

<gist>

</gist>


tags:
equalizeHist, cvtColor, normalize, calcHist

12/30/2017

opencv histogram stretching, example source code.

Histogram stretching
It's just adjusting the range with the same ratio.

For example, there is a range of numbers.
60, 61, 62, 63, 64, 65
Stretching is to extent other range, such as 0~255.
So, if we stitching 60~65 to 0~255, numbers will be like that.
60 -> 0
61 -> 51
62 -> 102
63 -> 153
64 -> 204
65 -> 255

so, in case of histogram, origin histogram will be stretched like that

image source : https://stackoverflow.com/questions/41118808/difference-between-contrast-stretching-and-histogram-equalization

then, let's look at code and result with real image.

origin input image


histogram


stretched image


histogram of stretched image


source code
<gist start>

<gist end>


12/28/2017

Hue histogram example opencv source code

Hue histogram example source code.

input


Hue histogram output


source code
<gist start>

<gist end>

calcHist for RGB image, opencv histogram example

A Example source code for rgb histogram, the source code uses calcHist function in opencv.

Important things in the source code are the part of split rgb mat to vector[3] and drawing part.
Read the code carefully, so then you can understand easliy. ^^

input


the result of rgb histogram


<gist code start>

<gist code end>


reference : https://docs.opencv.org/2.4/doc/tutorials/imgproc/histograms/histogram_calculation/histogram_calculation.html

calcHist for gray image, opencv Histogram example

This is example to use calcHist for grayimage.

input image


output


source code

end code


Gray image histogram without opencv function calHist

As you known, there is function for making histogram in Opencv, that is calcHist function.
But at this time, let's try get histogram without use calcHist.

Input image, we are going to convert from rgb to gray.


And this is result of histogram


So.. see the source code. I will be not difficult. ^^


10/19/2017

WebCam Histogram Test, OpenCV

Histogram Test on webcam stream
Refer to below source code..😀

test video


< gist >

< /gitst >


tags : normalize, calcHist, MatND


11/14/2014

cvCalcBackProjectPatch example source code


...
#include< cv.h>  
#include< highgui.h>  
  
void GetHSV (const IplImage* image, IplImage** h, IplImage** s, IplImage** v);  
  
int main()  
{  
    IplImage* src = cvLoadImage ("bluecup.jpg", 1);  
    IplImage* h_src = NULL;  
    IplImage* s_src = NULL;  
    GetHSV (src, &h_src, &s_src, NULL);  
    IplImage *images[] = {h_src,s_src};  
    CvHistogram* hist_src = NULL;  
  
    /*计算二维直方图*/  
    int dims = 2;  
    int size[] = {30, 32};  
    float range_h[] = {0, 180};  
    float range_s[] = {0, 256};  
    float* ranges[] = {range_h, range_s};  
    hist_src = cvCreateHist (dims, size, CV_HIST_ARRAY, ranges);  
    cvCalcHist (images, hist_src);  
    cvNormalizeHist (hist_src, 1);  
  
    IplImage* dst = cvLoadImage ("adrian1.jpg", 1);  
    IplImage* h_dst = NULL;  
    IplImage* s_dst = NULL;  
    GetHSV (dst, &h_dst, &s_dst, NULL);  
    images[0] = h_dst;  
    images[1] = s_dst;  
  
    CvSize patch_size = cvSize (src->width, src->height);  
    IplImage* result = cvCreateImage (cvSize(h_dst->width - patch_size.width + 1, h_dst->height - patch_size.height + 1),  
        IPL_DEPTH_32F, 1);  
    cvCalcBackProjectPatch (images, result, patch_size, hist_src, CV_COMP_CORREL, 1);  
    cvShowImage ("result", result);  
      

    CvPoint max_location;  
    cvMinMaxLoc(result, NULL, NULL, NULL, &max_location, NULL);  
    max_location.x += cvRound (patch_size.width / 2);  
    max_location.y += cvRound (patch_size.height / 2);  
  

    CvPoint top = cvPoint(max_location.x - patch_size.width / 2,max_location.y - patch_size.height / 2);  
    CvPoint bottom = cvPoint(max_location.x + patch_size.width / 2, max_location.y + patch_size.height / 2);  
    cvRectangle (dst, top, bottom, CV_RGB(255, 0, 0), 1, 8, 0);  
    cvShowImage ("dst", dst);  
  
    cvWaitKey (0);  
  
    cvReleaseImage(&src);    
    cvReleaseImage(&dst);    
    cvReleaseImage(&h_src);    
    cvReleaseImage(&h_dst);    
    cvReleaseImage(&s_dst);    
    cvReleaseImage(&s_src);    
    cvReleaseHist(&hist_src);    
    cvReleaseImage(&result);    
    cvDestroyAllWindows();  
}  
  
void GetHSV (const IplImage* image, IplImage** h, IplImage** s, IplImage** v)  
{  
    IplImage* hsv = cvCreateImage (cvGetSize (image), 8, 3);  
    cvCvtColor (image, hsv, CV_BGR2HSV);  
      
    if ((h != NULL) && (*h == NULL))  
        *h = cvCreateImage (cvGetSize(image), 8, 1);  
    if ((s != NULL) && (*s == NULL))  
        *s = cvCreateImage (cvGetSize(image), 8, 1);  
    if ((v != NULL) && (*v == NULL))  
        *v = cvCreateImage (cvGetSize(image), 8, 1);  
  
    cvSplit (hsv, *h, (s == NULL)?NULL:*s, (v == NULL)?NULL:*v, NULL);  
    cvReleaseImage (&hsv);  
}  


---

11/03/2014

OpenCV EMD(earth mover distance) example source code

EMD(earth mover distance) method is very good method to compare image similarity.
But processing time is slow.
For using the EMD compare, we should make signature value.
The EMD method compares two signatures value.

Firstly, we prepare histograms of 2 images.
And convert values of histrogram to signature.

A configuration of signature values is very simple.

bins value, x index, y index.
....

Of course this type is in case of 2d histogram.
More detail, see the source code.

In here I cannot explain earth mover distance algorithm.
please refer to internet information.

thank you.


origin images
 
result


...
#include < iostream>
#include < vector>

#include < stdio.h>      
#include < opencv2\opencv.hpp>    


#ifdef _DEBUG           
#pragma comment(lib, "opencv_core249d.lib")   
#pragma comment(lib, "opencv_imgproc249d.lib")   //MAT processing   
#pragma comment(lib, "opencv_highgui249d.lib")   
#else   
#pragma comment(lib, "opencv_core249.lib")   
#pragma comment(lib, "opencv_imgproc249.lib")      
#pragma comment(lib, "opencv_highgui249.lib")   
#endif   


using namespace cv;   
using namespace std;   


int main()   
{   

 //read 2 images for histogram comparing   
 ///////////////////////////////////////////////////////////////////////////////////////////////////////////////   
 Mat imgA, imgB;   
 imgA = imread(".\\image1.jpg");   
 imgB = imread(".\\image2.jpg");   


 imshow("img1", imgA);
 imshow("img2", imgB);


 //variables preparing   
 ///////////////////////////////////////////////////////////////////////////////////////////////////////////////   
 int hbins = 30, sbins = 32;    
 int channels[] = {0,  1};   
 int histSize[] = {hbins, sbins};   
 float hranges[] = { 0, 180 };   
 float sranges[] = { 0, 255 };   
 const float* ranges[] = { hranges, sranges};    

 Mat patch_HSV;   
 MatND HistA, HistB;   

 //cal histogram & normalization   
 ///////////////////////////////////////////////////////////////////////////////////////////////////////////////   
 cvtColor(imgA, patch_HSV, CV_BGR2HSV);   
 calcHist( &patch_HSV, 1, channels,  Mat(), // do not use mask   
  HistA, 2, histSize, ranges,   
  true, // the histogram is uniform   
  false );   
 normalize(HistA, HistA,  0, 1, CV_MINMAX);   


 cvtColor(imgB, patch_HSV, CV_BGR2HSV);   
 calcHist( &patch_HSV, 1, channels,  Mat(),// do not use mask   
  HistB, 2, histSize, ranges,   
  true, // the histogram is uniform   
  false );   
 normalize(HistB, HistB, 0, 1, CV_MINMAX);   

 //compare histogram   
 ///////////////////////////////////////////////////////////////////////////////////////////////////////////////   
 int numrows = hbins * sbins;

 //make signature
 Mat sig1(numrows, 3, CV_32FC1);
 Mat sig2(numrows, 3, CV_32FC1);

 //fill value into signature
 for(int h=0; h< hbins; h++)
 {
  for(int s=0; s< sbins; ++s)
  {
   float binval = HistA.at< float>(h,s);
   sig1.at< float>( h*sbins + s, 0) = binval;
   sig1.at< float>( h*sbins + s, 1) = h;
   sig1.at< float>( h*sbins + s, 2) = s;

   binval = HistB.at< float>(h,s);
   sig2.at< float>( h*sbins + s, 0) = binval;
   sig2.at< float>( h*sbins + s, 1) = h;
   sig2.at< float>( h*sbins + s, 2) = s;
  }
 }

 //compare similarity of 2images using emd.
 float emd = cv::EMD(sig1, sig2, CV_DIST_L2); //emd 0 is best matching. 
 printf("similarity %5.5f %%\n", (1-emd)*100 );
 
 waitKey(0);   

 return 0;   
}  

...

5/12/2014

(OpenCV) Hue Histogram drawing and get value of RGB and bin count (example source code using calcHist in openCV)

This histogram drawing source code is referenced Sample code of CAMshift in opencv.

We usually use hue color in hsv to get color distribution, because hue is a little bit free from lighting than RGB model.

The source code is example of drawing rgb graph from hue histogram.

I try to drawing color graph from 2 channel histogram, for example hue, saturation, but I failed, I don't know that is impossible or not.

But 1 channel is possible, refer to this source code and fiagure.

If you want to know how to get histogram, refer to this page.
http://feelmare.blogspot.kr/2014/05/open-cv-get-histogram-and-compare-color.html

Thank you.

-----
#include <  stdio.h>
#include <  iostream>
#include <  opencv2\opencv.hpp>


#ifdef _DEBUG        
#pragma comment(lib, "opencv_core247d.lib")
#pragma comment(lib, "opencv_imgproc247d.lib")   //MAT processing
#pragma comment(lib, "opencv_highgui247d.lib")
#else
#pragma comment(lib, "opencv_core247.lib")
#pragma comment(lib, "opencv_imgproc247.lib")
#pragma comment(lib, "opencv_highgui247.lib")
#endif 

using namespace cv;
using namespace std;


//get representative 3 color

int main()
{
 
 //read 2 images for histogram comparing
 ///////////////////////////////////////////////////////////////////////////////////////////////////////////////
 Mat imgA;
 Mat imgA_mask;
 imgA = imread(".\\image1.jpg");
 imgA_mask = imread(".\\image1_mask.jpg", 0);

 imshow("img1", imgA);
 imshow("img1_mask", imgA_mask);


 //variables preparing
 ///////////////////////////////////////////////////////////////////////////////////////////////////////////////
 int hbins = 30; 
 int channels[] = {0};
 int histSize[] = {hbins};
 float hranges[] = { 0, 180 };
 const float* ranges[] = { hranges}; 

 Mat patch_HSV;
 MatND HistA, HistB;

 //cal histogram & normalization
 ///////////////////////////////////////////////////////////////////////////////////////////////////////////////
 cvtColor(imgA, patch_HSV, CV_BGR2HSV);
 calcHist( &patch_HSV, 1, channels,  imgA_mask, //MaskForHisto, // // do use mask
     HistA, 1, histSize, ranges,
     true, // the histogram is uniform
     false );
 normalize(HistA, HistA,  0, 255, CV_MINMAX);


 //Mat for drawing 
 Mat histimg = Mat::zeros(200, 320, CV_8UC3); 
 histimg = Scalar::all(0);
 int binW = histimg.cols / hbins;
 Mat buf(1, hbins, CV_8UC3);
 //Set RGB color
 for( int i = 0; i <  hbins; i++ )
  buf.at< Vec3b>(i) = Vec3b(saturate_cast< uchar>(i*180./hbins), 255, 255);
 cvtColor(buf, buf, CV_HSV2BGR);
 //drawing routine
 for( int i = 0; i <  hbins; i++ )
 {
  int val = saturate_cast< int>(HistA.at< float>(i)*histimg.rows/255);
  
  rectangle( histimg, Point(i*binW,histimg.rows),
   Point((i+1)*binW,histimg.rows - val),
   Scalar(buf.at< Vec3b>(i)), -1, 8 );
  int r,g,b;
  b =  buf.at< Vec3b>(i)[0];
  g =  buf.at< Vec3b>(i)[1];
  r =  buf.at< Vec3b>(i)[2];

  //show bin and RGB value
  printf("[%d] r=%d, g=%d, b=%d , bins = %d \n",i , r, g, b, val);
 }
 imshow( "Histogram", histimg );


 waitKey(0);

 return 0;
}


----

(opencv) get histogram and compare color similarity of 2 images(calcHist, compareHist, example source code)

This is example source code of get Histogram and compare color similarity of 2 images.

To get histogram, we use calcHist function in opencv and use compareHist to comparing.

Generally, when comparing based color, HSV color medel is more accurate then RGB model.

And using 2 channel of Hue, Saturation is better than using only 1 channel. ex) hue

In calcHist parameters, there is mask option. The mask image is black and white image.

When set mask option, calcHist get histogram only white region pixels. So if you knwo foreground of image, comparing value will be better.

First source code is no mask option.
Second source code is mask option.


#include <  stdio.h>
#include <  iostream>
#include <  opencv2\opencv.hpp>

#ifdef _DEBUG        
#pragma comment(lib, "opencv_core247d.lib")
#pragma comment(lib, "opencv_imgproc247d.lib")   //MAT processing
#pragma comment(lib, "opencv_highgui247d.lib")
#else
#pragma comment(lib, "opencv_core247.lib")
#pragma comment(lib, "opencv_imgproc247.lib")
#pragma comment(lib, "opencv_highgui247.lib")
#endif 

using namespace cv;
using namespace std;


int main()
{
 
 //read 2 images for histogram comparing
 ///////////////////////////////////////////////////////////////////////////////////////////////////////////////
 Mat imgA, imgB;
 imgA = imread(".\\image1.jpg");
 imgB = imread(".\\image2.jpg");

 
 imshow("img1", imgA);
 imshow("img2", imgB);


 //variables preparing
 ///////////////////////////////////////////////////////////////////////////////////////////////////////////////
 int hbins = 30, sbins = 32; 
 int channels[] = {0,  1};
 int histSize[] = {hbins, sbins};
 float hranges[] = { 0, 180 };
 float sranges[] = { 0, 255 };
 const float* ranges[] = { hranges, sranges}; 

 Mat patch_HSV;
 MatND HistA, HistB;

 //cal histogram & normalization
 ///////////////////////////////////////////////////////////////////////////////////////////////////////////////
 cvtColor(imgA, patch_HSV, CV_BGR2HSV);
 calcHist( &patch_HSV, 1, channels,  Mat(), // do not use mask
     HistA, 2, histSize, ranges,
     true, // the histogram is uniform
     false );
 normalize(HistA, HistA,  0, 255, CV_MINMAX);


 cvtColor(imgB, patch_HSV, CV_BGR2HSV);
 calcHist( &patch_HSV, 1, channels,  Mat(),// do not use mask
     HistB, 2, histSize, ranges,
     true, // the histogram is uniform
     false );
 normalize(HistB, HistB, 0, 255, CV_MINMAX);


 //compare histogram
 ///////////////////////////////////////////////////////////////////////////////////////////////////////////////
 //비교하기
 float bc = compareHist(HistA, HistB, CV_COMP_BHATTACHARYYA); 
 printf("(The range of matcing value is 0~1, 1 is best matching, 0 means miss matching\n");
 printf("V = %lf \n", bc);


 waitKey(0);

 return 0;
}


#include <  stdio.h>
#include <  iostream>
#include <  opencv2\opencv.hpp>

#ifdef _DEBUG        
#pragma comment(lib, "opencv_core247d.lib")
#pragma comment(lib, "opencv_imgproc247d.lib")   //MAT processing
#pragma comment(lib, "opencv_highgui247d.lib")
#else
#pragma comment(lib, "opencv_core247.lib")
#pragma comment(lib, "opencv_imgproc247.lib")
#pragma comment(lib, "opencv_highgui247.lib")
#endif 

using namespace cv;
using namespace std;


int main()
{
 
 //read 2 images for histogram comparing
 ///////////////////////////////////////////////////////////////////////////////////////////////////////////////
 Mat imgA, imgB;
 Mat imgA_mask, imgB_mask;
 imgA = imread(".\\image1.jpg");
 imgB = imread(".\\image2.jpg");
 imgA_mask = imread(".\\image1_mask.jpg", 0);
 imgB_mask = imread(".\\image2_mask.jpg", 0);
 
 imshow("img1", imgA);
 imshow("img2", imgB);
 imshow("img1_mask", imgA_mask);
 imshow("img2_mask", imgB_mask);


 //variables preparing
 ///////////////////////////////////////////////////////////////////////////////////////////////////////////////
 int hbins = 30, sbins = 32; 
 int channels[] = {0,  1};
 int histSize[] = {hbins, sbins};
 float hranges[] = { 0, 180 };
 float sranges[] = { 0, 255 };
 const float* ranges[] = { hranges, sranges}; 

 Mat patch_HSV;
 MatND HistA, HistB;

 //cal histogram & normalization
 ///////////////////////////////////////////////////////////////////////////////////////////////////////////////
 cvtColor(imgA, patch_HSV, CV_BGR2HSV);
 calcHist( &patch_HSV, 1, channels,  imgA_mask, //MaskForHisto, // // do use mask
     HistA, 2, histSize, ranges,
     true, // the histogram is uniform
     false );
 normalize(HistA, HistA,  0, 255, CV_MINMAX);


 cvtColor(imgB, patch_HSV, CV_BGR2HSV);
 calcHist( &patch_HSV, 1, channels,  imgB_mask, //MaskForHisto, // // do use mask
     HistB, 2, histSize, ranges,
     true, // the histogram is uniform
     false );
 normalize(HistB, HistB, 0, 255, CV_MINMAX);


 //compare histogram
 ///////////////////////////////////////////////////////////////////////////////////////////////////////////////
 //비교하기
 float bc = compareHist(HistA, HistB, CV_COMP_BHATTACHARYYA); 
 printf("(The range of matcing value is 0~1, 1 is best matching, 0 means miss matching\n");
 printf("V = %lf \n", bc);


 waitKey(0);

 return 0;
}

9/09/2013

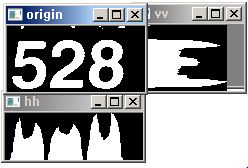
OpenCV, To create Histogram and Draw example source code

Example source code to make histogram and drawing.
Show the 'mareHistogram' function.
Input is Mat. The property is CV_8U and binary image.
Output is also Mat. The output Mat is image of histogram.
If you want to get histogram value array, you should get mhist Mat instead of histo in the function.

Thank you.


histogram, countNonZero, vertical, horizontal