10/31/2016

Real-time N camera stitching Class.

As you can see in the following video,
I created a class that stitching n cameras in real time.
https://www.youtube.com/user/feelmare/search?query=stitching

refer to this label, about stitching in my blog.
http://study.marearts.com/search/label/Stitching

The class name is CMareStitching.
This class was created to stitching_detailed examples of opencv by referencing.
So if you try, everybody can create this result.

The principle of class ... it is the main idea of ​​separating the calculation online and offline calculations such as url.
http://study.marearts.com/2015/02/real-time-stitching-multi-video-to-one.html


Main part to use this class is as follows.
< gist code start >

< gist code end >

First enter the index to camera stitching.
Press "p" is a real-time panoramic image after matching relations calculation.
Pressing "r" again return to the camera image.
It is quit by pressing the "q".

When you press a key it must be pressed on the video screen active.
The command window active, and not input the key.

As you see the main source code, there is no easy interface only code. so, you have to modify the code for your purpose, ex) the camera number.

The project code is uploaded privately on github but not free.
https://github.com/MareArts/Realtime_N_camera_Stitching
Why not share FREE asked, 2 reasoning, an little effort of me and Fundraising operating costs of blog(for other planed project)... very Sorry.

Below url is header, lib, dll files for developing.
You have to set path in visual studio.
https://www.amazon.com/clouddrive/share/zv7xEoQ0iBm0Cnaw76aTdQuTE1pdPskba0hgqJdb42n?ref_=cd_ph_share_link_copy

And this url is demo files. you can test to download.
The url includes execute file and related dlls.
https://www.amazon.com/clouddrive/share/zOZXmvrYTb4Er0OYg5qezmk24OPKq0znWlZKly4ZC01?ref_=cd_ph_share_link_copy


And this project coded by win32, opencv 249, visual studio 2012.

Thank you.


updating 42/06/2018
I have decided to sell source code ^^
If you have interest, go to here, you can buy source code


** 2021.06 updated ** 
realtime stitching SDK: 


#tags
VideoCapture, CMareStitching, stitching, realtime stitching

9/28/2016

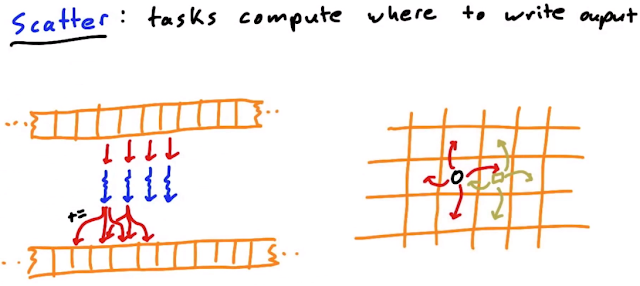
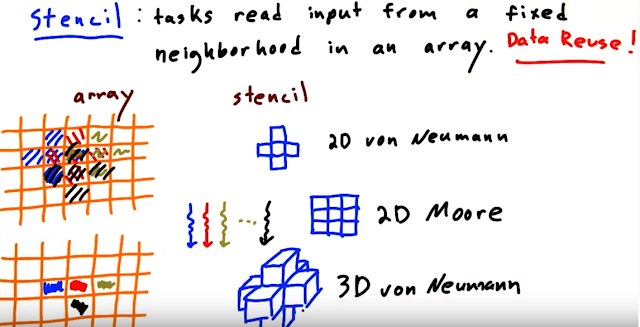
CUDA, GPGPU, Parallel communication pattern 5 -> Map, Gather, Scatter, Stencil, Transpose

1. Map : Tasks read from and write to specific data elements.


2. Gather : each calculation gathers input data elements together from different places to compute an output result.


3. Scatter : tasks compute where to write output


4. stencil


5. transpose


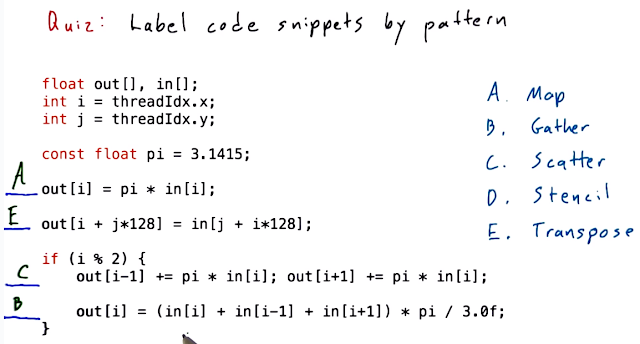
quiz


->
*out[i] = pi * in[i]
There is a 1-to-1 correspondence between the output and the input, so that's clearly an Map operation.

*out[i+j*128] = in[j+i*128];
i, j is reorder the array, so this is Transpose operation

*out[i-1] += pi * in[i]; out[i+1] += pi * in[i]
the value of calculation is placing the into a couple of different places in the output.
So Scatter operator

*out[i] = (in[i] + in[i-1] + in[i+1])* pi/3.0f;
every thread is writing a single location in the output array, and it's reading from multiple places in the input array, locations that it computes.
this looks very much like a stencil operation since it's reading from a local neighborhood, but because " if(i%2) ", it's not writing into every location.


image captured from UdaCity

9/23/2016

To run an external file to ShellExecute and kill processes. in MFC (and window active by PID or process handle)


Firstly, Check executing process to make by me.
And If process exist made by me, kill after check that saved PID is same.
"TerminateProcess" function used for kill process.
...
...
if (m_Manual_shell_hadle != NULL)
 {
  unsigned int tmp_pid = GetProcessId(m_Manual_shell_hadle); // retrieve PID
  //It comes under the pid value to the storage handle. Take on only kill pid is the same as the saved pid.
  if (tmp_pid == m_Manual_shell_pid)
  {
   TerminateProcess(m_Manual_shell_hadle, 1); //kill process
   m_Manual_shell_hadle = NULL;

   return 1; //sucess
  }
  
 }
 m_Manual_shell_hadle = NULL;
return 0; //not found
...
...


And, execute external file.

..
...
 SHELLEXECUTEINFO ShExecInfo = { 0 };
 ShExecInfo.cbSize = sizeof(SHELLEXECUTEINFO);
 ShExecInfo.fMask = SEE_MASK_NOCLOSEPROCESS;
 ShExecInfo.hwnd = this->m_hWnd;
 ShExecInfo.lpVerb = NULL;
        ShExecInfo.lpFile = TargetPath; //external file name
 ShExecInfo.lpParameters = NULL; //aguments
 ShExecInfo.lpDirectory = NULL;
 ShExecInfo.nShow = SW_SHOW;
 ShExecInfo.hInstApp = NULL;

ShellExecuteEx(&ShExecInfo); //execute 

  //save pid and handle
  m_Manual_shell_pid = GetProcessId(ShExecInfo.hProcess); // retrieve PID
  m_Manual_shell_hadle = ShExecInfo.hProcess;

...
...


"m_Manual_shell_pid, m_Manual_shell_hadle" is our member variable.


and one more thing, if we want to window activating or taking to top on screen, using hwnd, to use below function.
///
::BringWindowToTop(hwnd);
 ::SetActiveWindow(hwnd);
 ::SetForegroundWindow(hwnd);
 ::ShowWindow(hwnd, SW_SHOWNORMAL);
 ::UpdateWindow(hwnd);
///

But to use these functions, we have to know hwnd value to active window.
We just know HANDLE value, then we can get Process id, that PID using GetProcessId and then
we can know hwnd using by this pid.

this is little complex, we should use callback function this -> EnumWindows(...)
The usage is like that,

firstly, make own function -> EnumWindowsProcMy
And call EnumWindows and then get hwnd.
see example code

HWND g_HWND = NULL;
BOOL CALLBACK EnumWindowsProcMy(HWND hwnd, LPARAM lParam)
{
 DWORD lpdwProcessId;
 GetWindowThreadProcessId(hwnd, &lpdwProcessId);
 if (lpdwProcessId == lParam)
 {
  g_HWND = hwnd;
  return FALSE;
 }
 return TRUE;
}


int CSomeClass::ActiveManualWindowIfAlive()
{

        if (m_Manual_shell_hadle != NULL)
 {
  unsigned int tmp_pid = GetProcessId(m_Manual_shell_hadle); // retrieve PID
  if (tmp_pid == m_Manual_shell_pid)
  {
   g_HWND = NULL;
   EnumWindows(EnumWindowsProcMy, m_Manual_shell_pid);
   if (g_HWND != NULL)
   {
    ::BringWindowToTop(g_HWND);
    return 1;
   }

  }
  
 }

 return 0;

}


Thank you.

8/24/2016

slice 2d images to 3d volume plot in matlab

load mri
D = double(squeeze(D));

h = slice(D, [], [], 1:size(D,3));
set(h, 'EdgeColor','none', 'FaceColor','interp')
alpha(.1)


7/19/2016

double memcpy to byte, example. useful in serial communication

When we program the serial communication,
You may want to send double number in bytes, rather than strings.

In other words,
when we have 123123123123.123123123123 double value.
it is better send value to byte of sizeof(double), rather than the 25byte string.

The following example further, an example that sends a double 3 dogs as a byte.
...
double x = 1234.4567+10;
  double y = 2345.6789+10;
  double z = 3456.7891+10;

  char sendingStr[sizeof(double) * 3];

  memcpy(sendingStr, &x, sizeof(double));
  memcpy(sendingStr + sizeof(double), &y, sizeof(double));
  memcpy(sendingStr + sizeof(double) * 2, &z, sizeof(double));

  m_Comm.WriteComm((BYTE*)sendingStr, sizeof(double) * 3);
...


In addition, if there is the data to be send prefix is as follows.
...
double x = 1234.4567+10;
  double y = 2345.6789+10;
  double z = 3456.7891+10;

  char sendingStr[sizeof(double) * 3 + 2];
  sendingStr[0] = '_';
  sendingStr[1] = 'E';

  memcpy(sendingStr + 2, &x, sizeof(double));
  memcpy(sendingStr + 2 + sizeof(double), &y, sizeof(double));
  memcpy(sendingStr + 2 + sizeof(double) * 2, &z, sizeof(double));

  m_Comm.WriteComm((BYTE*)sendingStr, sizeof(double) * 3 + 2);
...

And so if you want to change the byte sent back to double is when you do the following:
...
double Mx, My, Mz;
   memcpy(&Mx, MxyzStr, sizeof(double));
   memcpy(&My, MxyzStr+sizeof(double), sizeof(double));
   memcpy(&Mz, MxyzStr + sizeof(double)*2, sizeof(double));
...

Creating a ghost usb boot

firstly, download this files, on here.

This link is my amazon drive. safe.

https://www.amazon.com/clouddrive/share/UsWjAZW1CWCnyIKsqSgzbXhyD10GdkQOTYoQNyNyBNv?ref_=cd_ph_share_link_copy


1)
HPUSBDisk.exe to install the files.
Run the installation file.

Unpack the compressed Bootingimg.zip.
and It sets the path where you extracted.

And click start button.

2)
autoexec.txt, and config.sys file to save your the usb.
(Autoexec.txt file is changed to the autoexec.bat file name.)

3)
After you extract the compressed GHOST.zip, stores with usb.

4)
Now the end if you set the boot order to boot to a usb!

5)
When the boot is called A:> ,  A:> ghost.exe  you can run the ghost.


opencv 3.0 trackbar simple example in video

simple example but good to understand

check..
What is the role of on_trackbar?
But function in Canny g_slider value, why use it?


< git hub - gist >

///